Mac Outlook Image Showing For Other Accounts
When inserting an image into the message body or using it in your signature, the image can unexpectedly change in size and/or become unsharp when sending even when it still looked sharp when composing. The cause of this issue lies in the way handles image dimensions in combination with its dpi value. This guide contains several solutions and workarounds to this issues. • • • • • • Background of the issue This issue usually happens when you are using a picture other than 96dpi. When inserting a picture, Outlook will rescale the image as if it was a 96dpi image.

I just upgraded to 10.12.4, rebuilt my mailboxes and tried to set “Download Attachments” to all. However, though I can see other files (e.g.ics files) I still can’t see/download/click on the image files on my Exchange account only, it works fine with Gmail. Note: As a default, Outlook prevents embedded pictures in email messages because junk mail senders can tell that your address is active if an email is opened with an active embedded picture. To view the pictures, click on Download pictures.
Outlook On Mac
This means that if you have a picture of 150dpi with a height of 88px, it will be displayed as an image of 56px high; 88px/150dpi * 96dpi = 56px It even gets worse; upon sending, Outlook will convert and compress (re-render) the images to 96dpi with the new dimensions permanently! This means that all the 'detailed' picture information is lost and you'll be sending an image of 96dpi which is 56px high. This is of course a severe and very visible quality loss. If your picture is less than 96dpi, then the opposite happens. A picture of 88px high with a dpi of 32 would then result in a 96dpi image of 264px high. So the result will be a very large image (but this time you can resize it back without the image becoming blurry).
Add Outlook Account To Mac
 This is a long outstanding issue/function/design choice which goes back all the way to. While this issue might not be a real issue when inserting pictures (which are usually too big anyway), it will become an issue when you have a carefully designed graphic to be used in a newsletter or signature; quality loss and unexpected changes in graphic sizes is not what you want then. Re-render the image at 96dpi The quickest and easiest way around this issue is to re-render your images at 96dpi.
Create an organization chart with SmartArt in Office 2016 for Mac By using a SmartArt graphic in Excel, PowerPoint, or Word, you can create a flow chart and include it in your worksheet, presentation, or document. 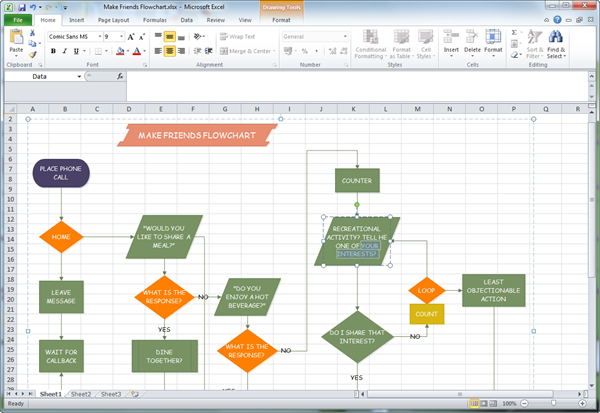 Create text boxes for the labels. To do this: Double-click a shape to access the Drawing Tools. Click Draw Text Box at the top. Click the place on the document where you want to add a text box, then drag the mouse to create a box. Repeat these steps for each part of the chart that needs a label. Let’s Make This in Microsoft Word. All the tools needed to make flowcharts in Microsoft Word 2013 or 2016 lie with the Drawing Tools. But first do these three preliminary steps: Maximize your page area. Collapse the Ribbon by clicking the little upward arrow (or dlick Ctrl + F1) on the extreme right so only the tab names show. Actually, adding a flowchart within a Microsoft Office program is as simple as adding a few shapes - we will use Microsoft PowerPoint 2011 in this example but you could really be using Word or Excel versions of Office 2011 to do the same task - even the Ribbon options you will encounter are the same.